5 Irresistible Peanut Butter Blossom Bars Recipes

If you’re craving a sweet treat that combines the perfect nutty flavor with a soft, chewy texture, look no further than Peanut Butter Blossom Bars. These bars bring together the classic joy of peanut butter and chocolate in a delightful handheld form, perfect for any occasion. Whether you’re baking for a holiday, packing snacks for school, or just indulging your sweet tooth, these Peanut Butter Blossom Bars are easy to make, irresistibly tasty, and guaranteed to be a crowd favorite.
Why You’ll Love This Recipe
- Comforting Nostalgia: These bars take the beloved Peanut Butter Blossom cookie and transform it into an easy-to-eat brownie-style treat.
- Simple Ingredients: You don’t need fancy pantry items—just a handful of basic baking staples that pack big flavor.
- Versatile Snack: Perfect for lunchboxes, parties, or last-minute desserts, Peanut Butter Blossom Bars fit every occasion.
- Nutty and Chocolatey Harmony: The classic combo of peanut butter and a Hershey’s Kiss on top brings irresistible flavor and texture balance.
- Fun to Customize: Easily adaptable with add-ins or different chocolate types to suit your taste preferences.
Ingredients You’ll Need
Before you start, gather these simple but essential ingredients that make Peanut Butter Blossom Bars a hit. Each one contributes to the perfect texture, flavor depth, and that iconic nutty-sweet taste.
- Peanut Butter: Use creamy for smooth batter and moist texture; natural peanut butter works too, but expect a denser bar.
- Granulated Sugar: Adds sweetness and helps create a cakey crumb in the bars.
- Brown Sugar: Boosts moisture and adds a toffee-like flavor that complements peanut butter.
- Eggs: Bind the ingredients together and provide structure to the bars.
- All-Purpose Flour: Gives the bars just enough body while keeping them soft.
- Baking Soda: A little leavening agent to help the bars rise lightly without becoming cakey.
- Salt: Enhances flavors and balances the sweetness perfectly.
- Vanilla Extract: Brings subtle warmth and depth to the batter.
- Hershey’s Kisses or Chocolate Candies: The iconic chocolate center that melts slightly into the bars, delivering that signature Peanut Butter Blossom look and taste.
Variations for Peanut Butter Blossom Bars
One of the best things about Peanut Butter Blossom Bars is how easy it is to make them your own. Whether you’re looking to swap ingredients or add a twist, here are some popular ways to customize your bars.
- White Chocolate Bliss: Replace the classic Hershey’s Kisses with white chocolate for a sweeter, creamier bite.
- Nut-Free Alternative: Use seed butter such as sunflower seed butter to accommodate allergies without losing flavor.
- Chunky Style: Stir in chopped peanuts or chocolate chips for added crunch and texture.
- Chocolate Peanut Butter Bars: Mix cocoa powder into the batter for a double layer of chocolate goodness.
- Gluten-Free Option: Swap all-purpose flour with a 1:1 gluten-free baking blend and follow the same steps.

How to Make Peanut Butter Blossom Bars
Step 1: Preheat and Prepare
Preheat your oven to 350°F (175°C) and grease a 9×13-inch baking pan or line it with parchment paper for easy removal.
Step 2: Mix the Wet Ingredients
In a large mixing bowl, beat together the peanut butter, granulated sugar, and brown sugar until smooth and creamy. Add the eggs and vanilla extract, mixing thoroughly until fully combined.
Step 3: Combine Dry Ingredients
In a separate bowl, whisk the flour, baking soda, and salt. Gradually incorporate the dry mixture into the wet ingredients, stirring just until combined to avoid overmixing.
Step 4: Bake the Bars
Spread the batter evenly in the prepared pan. Bake for about 18-22 minutes or until the edges are set and a toothpick comes out with a few moist crumbs.
Step 5: Add Chocolate Kisses
Remove the pan from the oven and immediately press Hershey’s Kisses into each bar section, gently pushing them down so they stick but don’t fully sink.
Step 6: Cool and Slice
Allow the bars to cool completely in the pan so the chocolate can set. Once cooled, slice into squares and enjoy!
Pro Tips for Making Peanut Butter Blossom Bars
- Use room temperature eggs and peanut butter: This helps achieve a smooth batter that blends well.
- Don’t overmix the batter: Overmixing can make bars tough instead of tender.
- Score before baking: Lightly score the batter before baking to help with clean, even slices.
- Press chocolate while warm: Adding the kisses right out of the oven ensures they stick perfectly.
- Cool completely before cutting: This prevents the bars from crumbling and helps maintain their shape.
How to Serve Peanut Butter Blossom Bars
Garnishes
Enhance presentation by dusting bars with powdered sugar, drizzling melted chocolate on top, or sprinkling crushed peanuts around the edges for a fancy yet approachable look.
Side Dishes
Pair these bars with a scoop of vanilla ice cream for dessert or serve alongside fresh fruit for a balanced snack that complements the rich peanut butter taste.
Creative Ways to Present
Place Peanut Butter Blossom Bars on a tiered dessert platter for parties, wrap individual bars in parchment for on-the-go treats, or serve warm with a dollop of whipped cream for cozy evenings.
Make Ahead and Storage
Storing Leftovers
Store the bars in an airtight container at room temperature for up to 3 days, or refrigerate to extend freshness for up to a week.
Freezing
Wrap bars individually in plastic wrap and place them in a freezer-safe bag. Freeze for up to 3 months for a quick treat anytime you want.
Reheating
To enjoy bars warm, microwave them for 10-15 seconds or briefly heat in a preheated oven at 300°F (150°C) until just warm—just be sure not to melt the chocolate completely.
FAQs
Can I use natural peanut butter for these bars?
Absolutely! Natural peanut butter works well, but it can make the bars denser. You might need to adjust baking time slightly and ensure thorough mixing.
What if I don’t have Hershey’s Kisses?
No problem! Use any chocolate candies, chocolate chips, or even mini peanut butter cups as a delicious alternative topping.
Are Peanut Butter Blossom Bars gluten-free?
The classic recipe uses all-purpose flour, but you can easily substitute a gluten-free flour blend to make them suitable for gluten-free diets.
How long do these bars keep fresh?
Stored in an airtight container, they stay fresh at room temperature for about 3 days or up to a week refrigerated.
Can I double this recipe?
Yes! Simply double all the ingredients and bake in a larger pan, keeping an eye on the baking time as it might vary slightly.
Final Thoughts
Ready to treat yourself and your loved ones? Peanut Butter Blossom Bars offer that perfect balance of nutty sweetness and chocolatey charm in a format that’s easy to bake and share. Whip up a batch, customize it to your liking, and watch these bars disappear fast. You’re going to love how these become your go-to dessert for any time you want a delicious, comforting bite!
Related Posts
- Why Orange Ginger Honey Loaf Cakes Delight
- Why Blueberry Crumble Cheesecake Steals Hearts
- Easy Red Velvet Brownies with Cream Cheese Frosting
Peanut Butter Blossom Bars
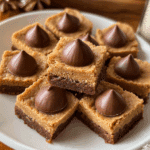
Peanut Butter Blossom Bars combine the classic nutty flavor of peanut butter with a soft, chewy texture and a chocolatey center, perfect for any occasion. These easy-to-make bars capture the nostalgic joy of Peanut Butter Blossom cookies in a convenient, handheld brownie-like treat, ideal for snacks, parties, or desserts.
- Prep Time: 10 minutes
- Cook Time: 18-22 minutes
- Total Time: 30-35 minutes
- Yield: 24 bars 1x
- Category: Dessert
- Method: Baking
- Cuisine: American
- Diet: Gluten Free (if gluten-free flour used)
Ingredients
Main Ingredients
- 1 cup creamy peanut butter (natural peanut butter can be used, but bars will be denser)
- 1 cup granulated sugar
- 1/2 cup brown sugar
- 2 large eggs, room temperature
- 1 1/2 cups all-purpose flour (or 1:1 gluten-free baking blend for gluten-free option)
- 1 teaspoon baking soda
- 1/2 teaspoon salt
- 1 teaspoon vanilla extract
- 30–36 Hershey’s Kisses or chocolate candies
Instructions
- Preheat and Prepare: Preheat your oven to 350°F (175°C) and grease a 9×13-inch baking pan or line it with parchment paper for easy removal.
- Mix the Wet Ingredients: In a large mixing bowl, beat together the peanut butter, granulated sugar, and brown sugar until smooth and creamy. Add the eggs and vanilla extract, mixing thoroughly until fully combined.
- Combine Dry Ingredients: In a separate bowl, whisk the flour, baking soda, and salt. Gradually incorporate the dry mixture into the wet ingredients, stirring just until combined to avoid overmixing.
- Bake the Bars: Spread the batter evenly in the prepared pan. Bake for about 18-22 minutes or until the edges are set and a toothpick comes out with a few moist crumbs.
- Add Chocolate Kisses: Remove the pan from the oven and immediately press Hershey’s Kisses into each bar section, gently pushing them down so they stick but don’t fully sink.
- Cool and Slice: Allow the bars to cool completely in the pan so the chocolate can set. Once cooled, slice into squares and enjoy!
Notes
- Use room temperature eggs and peanut butter to help achieve a smooth batter that blends well.
- Don’t overmix the batter to keep the bars tender instead of tough.
- Score the batter lightly before baking to achieve clean, even slices.
- Press chocolate candies into the bars immediately after baking while still warm to ensure they stick well.
- Cool bars completely before cutting to prevent crumbling and maintain their shape.
- Customize by adding chopped peanuts, chocolate chips, cocoa powder, or using alternative butters for allergies or preferences.
Nutrition
- Serving Size: 1 bar
- Calories: 210
- Sugar: 18g
- Sodium: 150mg
- Fat: 12g
- Saturated Fat: 3g
- Unsaturated Fat: 8g
- Trans Fat: 0g
- Carbohydrates: 22g
- Fiber: 2g
- Protein: 6g
- Cholesterol: 35mg
Keywords: peanut butter bars, peanut butter blossom bars, chocolate peanut butter bars, easy peanut butter dessert, gluten free peanut butter bars