How to Make No Churn Oreo Ice Cream Easily

If you’re craving a luscious, crunchy, and creamy dessert without the hassle of an ice cream maker, this No Churn Oreo Ice Cream recipe is your new best friend. Made with just a few simple ingredients, this homemade treat combines velvety whipped cream, sweetened condensed milk, and plenty of crushed Oreos to deliver the ultimate dessert experience that anyone can whip up in minutes. Whether it’s a hot summer day or a cozy night in, this no-fuss recipe will satisfy your sweet tooth effortlessly.
Why You’ll Love This Recipe
- Simple preparation: You don’t need any fancy equipment or churners, just a bowl and a spatula.
- Creamy texture: The whipped cream base gives a smooth, rich, and airy feel that melts in your mouth.
- Family favorite: Oreos add fun crunch and nostalgic flavor for both kids and adults alike.
- Customizable: Easily add mix-ins or switch up the cookies for your unique twist.
- Time saver: Ready to eat in just a few hours with simple chilling, no constant stirring required.
Ingredients You’ll Need
This recipe keeps it straightforward with pantry staples that combine to create incredible flavor, perfect texture, and that distinct Oreo crunch you love.
- Heavy whipping cream: This creates the fluffy, smooth base that makes the ice cream creamy without churning.
- Sweetened condensed milk: Adds natural sweetness and softens the texture while helping it freeze well.
- Vanilla extract: A splash of vanilla enhances the richness and rounds out all the flavors.
- Oreos: Crushed but not pulverized, these give your ice cream its signature chocolate and cream cookie texture.
Variations for No Churn Oreo Ice Cream
Feel free to get creative! This No Churn Oreo Ice Cream recipe is easy to tweak, so you can cater to dietary needs or simply switch up flavors to match your mood.
- Double chocolate Oreo: Mix in chocolate chips or drizzle melted chocolate on top for an extra chocolate boost.
- Mint Oreo twist: Add a few drops of peppermint extract for a refreshing flavor combo.
- Vegan alternative: Use coconut cream and dairy-free condensed milk for a plant-based treat.
- Peanut butter swirl: Gently fold in peanut butter ribbons for a nutty surprise in every bite.
- Fruit mix-ins: Add chopped strawberries or raspberries for a fruity contrast with the Oreos.

How to Make No Churn Oreo Ice Cream
Step 1: Prepare the Whipped Cream
Start by pouring the cold heavy whipping cream into a large mixing bowl. Using an electric mixer or a sturdy whisk, whip the cream until soft peaks form. This means when you lift the whisk, the cream holds a peak that softly bends over. This step sets the creamy base that makes your no churn ice cream incredibly light and fluffy.
Step 2: Mix in Sweetened Condensed Milk and Vanilla
Gently fold the sweetened condensed milk and vanilla extract into the whipped cream. Folding means carefully mixing the ingredients with a spatula using a gentle motion to keep the whipped cream from deflating. Blend until well combined to create a smooth, dreamy base for your ice cream.
Step 3: Crush the Oreos
Take your Oreos and crush them into bite-sized chunks. You want a mix of finely crushed crumbs and larger pieces for that perfect crunch. You can do this in a plastic bag with a rolling pin or pulse gently in a food processor—just keep some texture!
Step 4: Fold Oreos into the Ice Cream Base
Slowly fold your crushed Oreos into the whipped cream mixture until they’re evenly dispersed. Be gentle to avoid losing the airiness of the whipped cream but make sure every spoonful gets plenty of cookie goodness.
Step 5: Freeze Until Firm
Pour the mixture into a freezer-safe container and spread it out evenly. Cover with a lid or plastic wrap and freeze for at least 4 hours or overnight until firm but scoopable. Patience now pays off in dreamy, homemade ice cream bliss!
Pro Tips for Making No Churn Oreo Ice Cream
- Chill your tools: Keep your mixing bowl and beaters cold to whip cream more quickly and effectively.
- Don’t overmix: Fold gently when adding condensed milk and Oreos to retain maximum fluffiness.
- Crush Oreos strategically: Leave some larger chunks for texture and smaller crumbs to distribute flavor evenly.
- Use fresh whipping cream: Fresh cream whips better and gives a superior final texture.
- Cover tightly before freezing: This prevents freezer burn and helps maintain creamy texture.
How to Serve No Churn Oreo Ice Cream
Garnishes
Sprinkle extra crushed Oreos on top or add a drizzle of chocolate syrup or caramel for a stunning and tasty finish. Whipped cream and a few cookie halves also make the presentation pop, turning your dessert into a showstopper.
Side Dishes
This ice cream pairs beautifully with warm brownies, freshly baked cookies, or even a hot fudge cake. The warmth of the dessert base contrasts perfectly with the cold, crunchy Oreo ice cream.
Creative Ways to Present
Try serving in Oreo cookie bowls or waffle cones lined with melted chocolate for fun textural surprises. Or layer it in parfait glasses with extra cookie crumbs and whipped cream for a delightful layered treat that’s almost too pretty to eat.
Make Ahead and Storage
Storing Leftovers
Keep your leftover No Churn Oreo Ice Cream covered tightly with plastic wrap or a lid in the freezer to maintain freshness and prevent ice crystals from forming. It should stay fresh for up to two weeks.
Freezing
This no churn recipe freezes beautifully. Just make sure to place it in a shallow container and press plastic wrap directly onto the surface before sealing to keep the texture creamy and smooth.
Reheating
No reheating needed here! Simply take the ice cream out of the freezer about 5–10 minutes before serving to soften slightly for easier scooping and the best creamy experience.
FAQs
Can I use different cookies in the recipe?
Absolutely! While Oreos are classic, feel free to substitute with other sandwich cookies or even chocolate chip cookies chopped into pieces for a new twist.
Do I need an ice cream maker?
No ice cream maker is needed for this recipe—it’s designed to be easy and churn-free, using whipped cream and condensed milk to achieve the perfect texture.
How long does the ice cream last in the freezer?
If stored properly in an airtight container, your No Churn Oreo Ice Cream can last up to two weeks without losing quality.
Can I make this recipe dairy-free?
Yes! Swap out heavy cream with coconut cream and choose a dairy-free condensed milk alternative to make a vegan version that’s just as tasty.
What’s the best way to crush Oreos?
For varied texture, place Oreos in a plastic bag and gently crush with a rolling pin or use a food processor timed with just a few pulses to retain some chunky bits.
Final Thoughts
Making your own No Churn Oreo Ice Cream at home is not only incredibly fun but endlessly rewarding with every creamy, crunchy bite. This recipe is a perfect way to impress family and friends without the fuss of complicated equipment or long wait times. So grab your mixing bowl, Oreo cookies, and get ready to enjoy a classic, homemade dessert that feels like a celebration in every scoop. You’ll want to make it again and again!
Related Posts
- How to Make Caribbean Cloud Candy at Home
- How to Make Tico Taco Cupcakes at Home
- Why Lemon Zucchini Bread is a Must-Bake Treat
No Churn Oreo Ice Cream
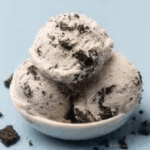
No Churn Oreo Ice Cream is a simple, no-fuss homemade dessert that combines fluffy whipped cream, sweetened condensed milk, vanilla, and plenty of crunchy Oreo cookie pieces. This creamy, crunchy treat doesn’t require an ice cream maker and is ready after just a few hours of freezing, perfect for satisfying your sweet tooth any time.
- Prep Time: 15 minutes
- Cook Time: 0 minutes
- Total Time: 4 hours 15 minutes
- Yield: 8 servings 1x
- Category: Dessert
- Method: No-churn freezing
- Cuisine: American
- Diet: Vegetarian
Ingredients
Main Ingredients
- 2 cups heavy whipping cream (cold)
- 1 can (14 oz) sweetened condensed milk
- 1 teaspoon vanilla extract
- 15–20 Oreo cookies, crushed into bite-sized chunks
Instructions
- Prepare the Whipped Cream: Pour the cold heavy whipping cream into a large mixing bowl. Using an electric mixer or a sturdy whisk, whip the cream until soft peaks form, where the cream holds a peak that softly bends over when the whisk is lifted. This creates the light and fluffy base of the ice cream.
- Mix in Sweetened Condensed Milk and Vanilla: Gently fold the sweetened condensed milk and vanilla extract into the whipped cream using a spatula. Use a gentle folding motion to keep the whipped cream airy and combine everything into a smooth, creamy base.
- Crush the Oreos: Place the Oreo cookies in a plastic bag and crush them into a mixture of finely crushed crumbs and larger chunks to maintain texture. Alternatively, pulse gently a few times in a food processor.
- Fold Oreos into the Ice Cream Base: Slowly fold the crushed Oreos into the whipped cream mixture until evenly distributed, maintaining as much air as possible to keep the mixture light and fluffy.
- Freeze Until Firm: Transfer the mixture into a freezer-safe container and spread it evenly. Cover with a lid or plastic wrap and freeze for at least 4 hours or overnight until firm but scoopable.
Notes
- Chill your mixing bowl and beaters beforehand to whip the cream more quickly and effectively.
- Do not overmix when folding in condensed milk and Oreos to retain maximum fluffiness.
- Leave a combination of larger chunks and smaller crumbs of Oreos for the best texture.
- Use fresh heavy cream for superior whipping and texture.
- Cover tightly before freezing to prevent freezer burn and maintain creamy texture.
Nutrition
- Serving Size: 1/8 of recipe (about 1/2 cup)
- Calories: 300
- Sugar: 28g
- Sodium: 120mg
- Fat: 20g
- Saturated Fat: 12g
- Unsaturated Fat: 6g
- Trans Fat: 0g
- Carbohydrates: 26g
- Fiber: 1g
- Protein: 3g
- Cholesterol: 70mg
Keywords: no churn ice cream, Oreo ice cream, easy dessert, no ice cream maker, homemade ice cream, Oreo dessert, quick ice cream